🌐 Cloudflare Tunnel — Phase 1
Project
GraniteLabs.ai – Secure Remote Access (Blue Iris)
Status: Phase 1 Complete – Awaiting Onsite Installation (Phase 2)
🎯 Objective
Establish a secure, zero-port-forwarding remote access method to internal LAN services (Blue Iris) using Cloudflare Tunnel.
🧠 Architecture Goal
- Eliminate open ports on firewall
- Avoid VPN dependency
- Use Cloudflare Zero Trust for secure access
- Route external HTTPS traffic → internal Blue Iris web server
🌍 Domain Configuration
Domain: granitelabs.ai
Completed Actions
- Domain added to Cloudflare
- Free Cloudflare plan selected
- DNS records imported:
- MX (Microsoft 365)
- TXT (SPF + MS verification)
- CNAME (autodiscover, www)
Nameservers
- ****.ns.cloudflare.com
- *****.ns.cloudflare.com
Status
- ✅ Domain Active
- ✅ DNS managed by Cloudflare
🔐 Cloudflare Zero Trust Setup
- Accessed via: https://dash.cloudflare.com/one/
- Guided onboarding skipped (manual setup preferred)
🚇 Tunnel Configuration
Location:
Zero Trust → Networks → Connectors
Tunnel Details
- Name:
blueiris-tunnel - Type: Cloudflared (outbound connector)
Status
- ✅ Tunnel created
- ⛔ Connector not installed yet
🖥️ Connector Preparation
Platform: Windows (64-bit)
Installer: cloudflared-windows-amd64.msi
Notes
- “amd64” = standard 64-bit (Intel + AMD)
- No compatibility concerns
Target Device
- Blue Iris PC (Puget System)
🔑 Authentication Token
- Generated in Cloudflare
- Tied to
blueiris-tunnel - Will be used in Phase 2 installation
🔒 Security Planning (Deferred)
Phase 2
- Cloudflare Access (Zero Trust)
- Email-based authentication
- Optional SSO / OTP
Future
- DMARC policy
- Align with M365 (SPF + DKIM)
🌐 Planned Hostname
bi.granitelabs.ai
➡ Will route to Blue Iris local web server
📊 Current System State
| Component | Status |
|---|---|
| Domain Active | ✅ |
| DNS via Cloudflare | ✅ |
| Tunnel Created | ✅ |
| Connector Installed | ❌ |
| Blue Iris Exposure | ❌ |
| Open Ports | ❌ |
🚧 Phase 2 (Onsite)
Steps
- Install
cloudflaredon Blue Iris PC - Authenticate using tunnel token
- Bring tunnel online
- Create hostname:
bi.granitelabs.ai
- Map to:
http://localhost:<BI_PORT>
- Configure Cloudflare Access
- Test remote access
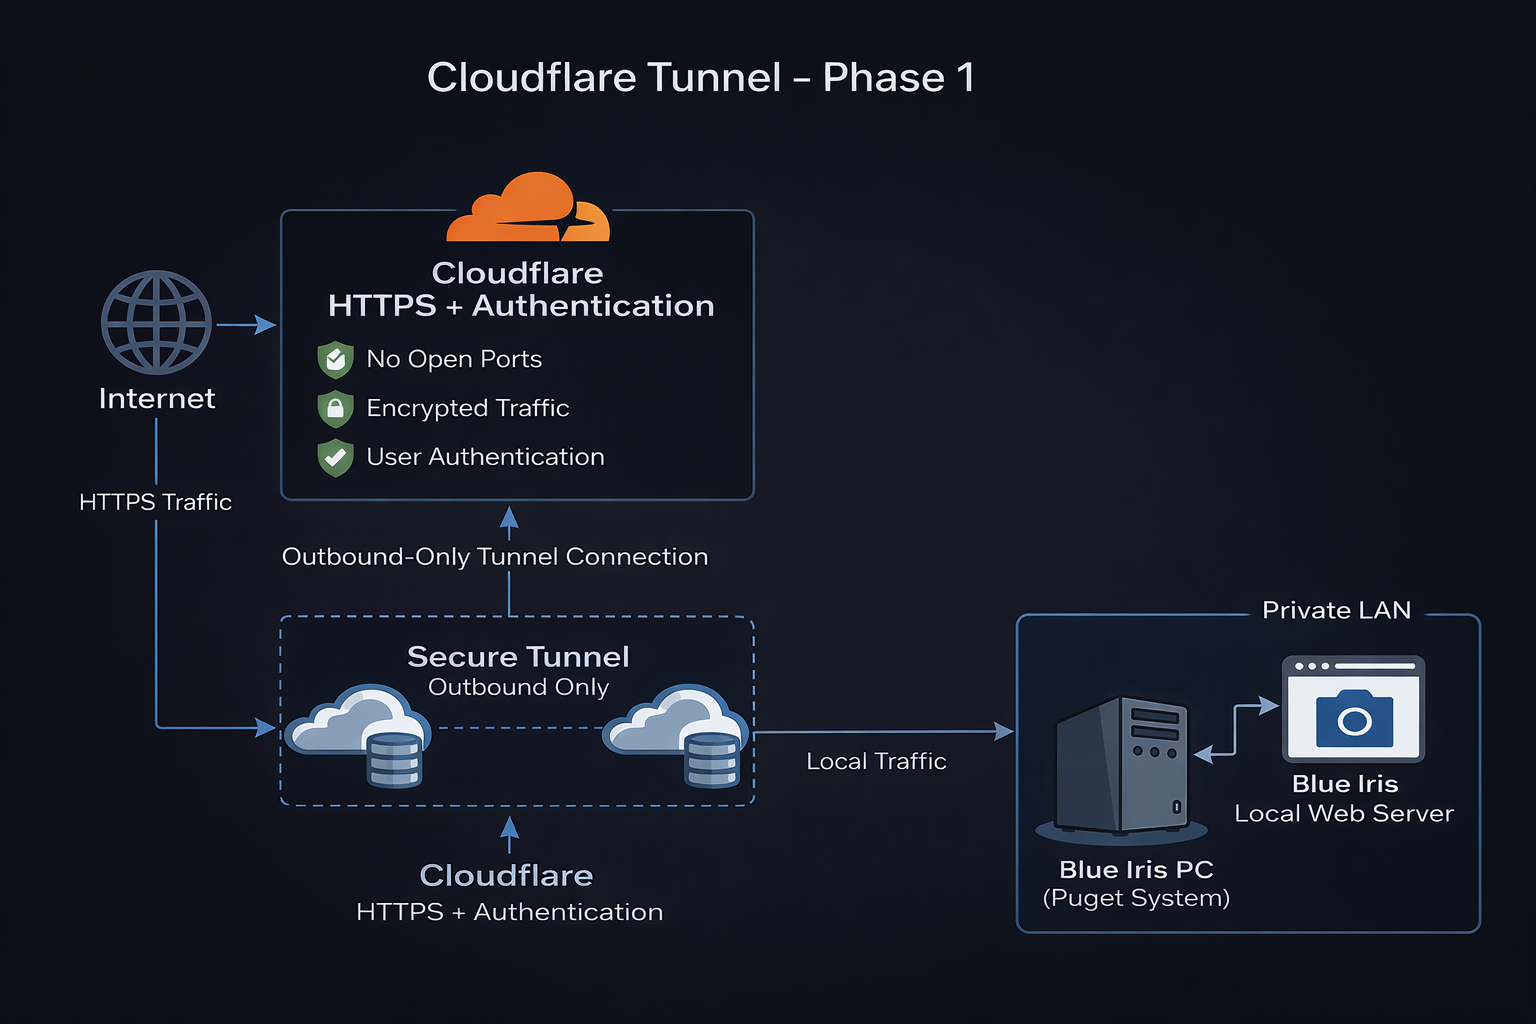
🔐 Security Model
Internet
↓
Cloudflare (HTTPS + Authentication)
↓
Secure Tunnel (Outbound Only)
↓
Blue Iris PC (cloudflared)
↓
Blue Iris Web Server
📝 Notes
- No port forwarding required
- WAN IP is never exposed
- HTTPS enforced via Cloudflare
- Adds identity-based access layer
▶ Next Step
Phase 1 is complete. Continue to onsite implementation.
➡ Continue to Phase 2:
/networking/cloudflare-tunnel/phase2-onsite-installation
👉 Begin Phase 2 when onsite:
Command:
Start Phase 2